
Affiliate Disclosure: EntrywayConsoleTable is reader-supported. When you buy through links on this site, we may earn a small commission at no extra cost to you.
Console table wall placement looks simple until outlets, baseboards, and off-center walls intervene. A methodical approach — center, level, align art, manage cords — delivers that built-in, intentional look.
Quick answer: Center your 48-60” console on usable wall length, push nearly flush leaving 0.5-1” for baseboards, hang mirrors 6-8” above, offset 4-6” for outlets, and anchor tall narrow tables to studs for safety and stability.
Key Takeaways
- Center table to usable wall (excluding trim), not total wall length.
- Leave 0.5-1 inch for baseboards; shim to prevent wobble.
- Hang mirrors/art 6-8 inches above, center near 57 inches high.
- Offset for outlets or choose open-back designs for cord access.
- Anchor narrow or tall consoles with anti-tip straps into studs.
- Keep 36 inches of walking clearance in front after pushing into place.
Step-by-Step Wall Placement
1. Find center and tape it
Mark usable wall center at 31 inches high with painter’s tape. Align table center to that mark, leaving at least 6 inches each end to doors and corners. For long walls, apply the two-thirds rule from standard dimensions. Confirm overall fit with how to measure.
2. Go nearly flush
Push back until legs touch baseboard — typically 0.5-1 inch off drywall. This preserves maximum walking path per clearance guide. Check level side-to-side; shim low legs with felt pads so lamps do not wobble.
| Wall Feature | Gap to Leave | Solution |
|---|---|---|
| Standard baseboard | 0.5-1” | Push to baseboard, felt pads behind |
| Outlet plate | 1-1.5” + access | Offset 4-6” or open-back table |
| Chair rail protrusion | 0.75” | Notch or stay below rail |
| Vent/return | Full clearance | Move table section, never cover |
3. Align art and lighting
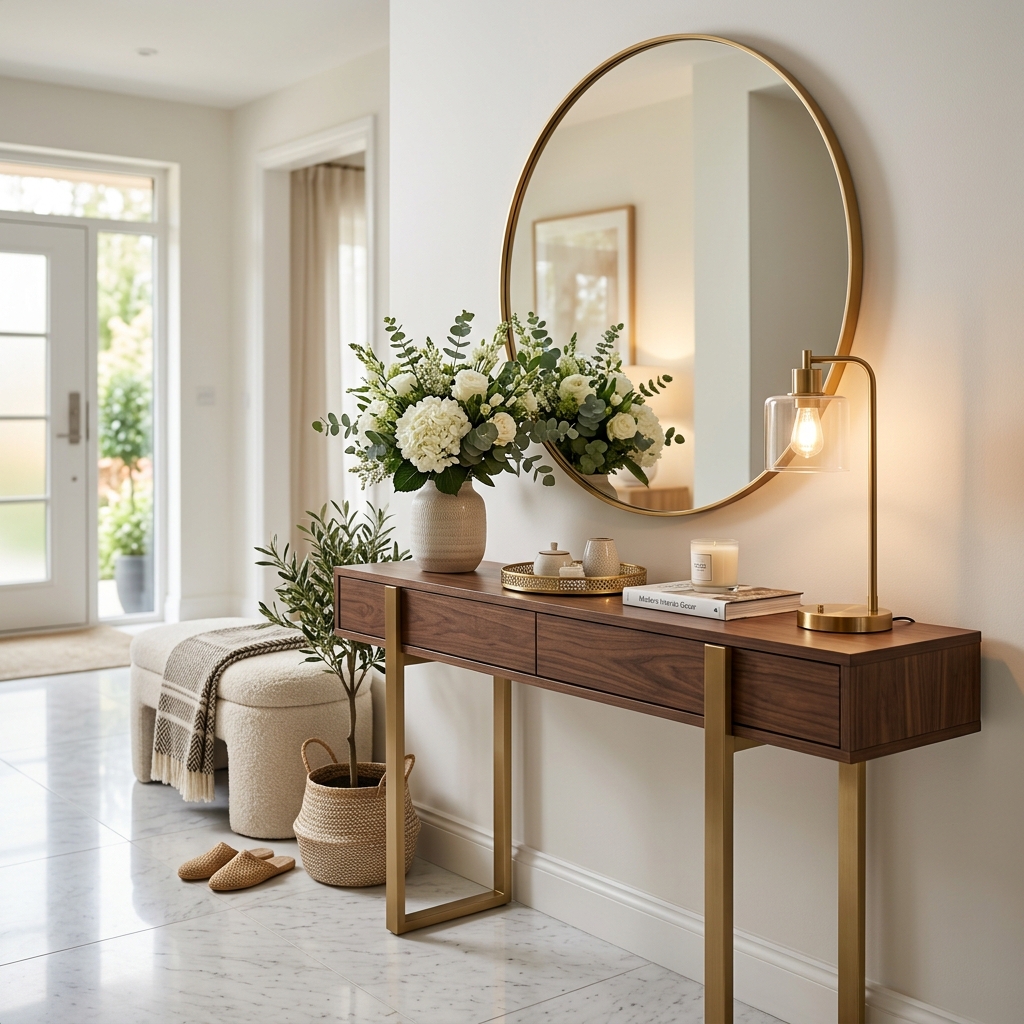
Center mirror/art to the table, not the room. Bottom edge 6-8 inches above top; for a 31-inch table that is 37-39 inches off floor. Flank 24-28 inch lamps equidistant from center, 8-10 inches from each end. More height detail in ideal height.
Outlet and switch tactics
If an outlet sits dead-center, slide the whole vignette 4-6 inches — asymmetry is invisible once art moves with it. Or route lamp cords through adhesive cord channels painted wall-color. Keep light switches fully visible; never let frames overlap plates.
4. Anchor for safety
Strap 30-36 inch tall, 8-12 inch deep consoles to studs (16-inch centers) with two anti-tip kits rated 50+ lbs. This is essential in small entryways where bumps are frequent and for traffic flow safety.
For hallway-specific centering near doors, see hallway placement.
Leveling, Anti-Tip, and Long-Term Stability
Walls are rarely plumb and floors rarely level — expect 1/8 to 1/4 inch variance across 60 inches. Set a 24-inch level on the top both lengthwise and front-to-back; shim the low leg with 1/16-inch felt or composite shims until bubble centers. Rock-test diagonally: press opposite corners alternately. Any click means wobble that will amplify lamp vibration and drawer rattle.
For anti-tip, drive two 2-inch #8 screws through strap brackets into studs (typically 16 inches on center; use a stud finder at 44-60 inches high behind the table). Masonry or plaster walls need 3/16-inch toggle bolts rated 50+ lbs each. Tighten straps so the table can still shift 1/4 inch for cord access but cannot tip past 10 degrees when a 25-lb drawer load extends 12 inches. In rentals, use adhesive-backed 30-lb furniture straps plus a 10-lb sandbag on the lower shelf as ballast — removable yet effective.
Re-check level seasonally: hardwood floors swell 1/16 inch in humid summers, loosening shims. Keep spare felt pads 1/8 inch thick in the drawer for quick fixes.
Styling After Placement
Once anchored, style in thirds: tall lamp or branches one end (24-28 inches), mid vase center (12-18 inches), low tray other end (4-6 inches). Keep total depth of decor 2 inches inside table edge to avoid snags. Ground with baskets below and a runner extending 6 inches beyond each end.
Final Alignment Checklist
Step back 10 feet to the front-door viewpoint and check four lines: tabletop level horizontally, mirror centered to table (not room) with equal 6+ inch end margins, lamp shades at equal heights within 0.5 inch, and rug extending evenly 6 inches each end. Crouch to 36 inches — child eye height — confirming no sharp corners jut at forehead level and cords hide fully behind legs. Open adjacent doors and drawers simultaneously; nothing should touch. Photograph day and night: daylight reveals color alignment, lamplight reveals glare on glass and mirror hot spots to adjust.
Dust behind consoles quarterly — 0.5-inch gaps collect debris — and re-tighten straps yearly, as seasonal wood movement loosens brackets slightly over time.
Common Mistakes to Avoid
- Centering to total wall: ignoring 8 inches of casing leaves the table visibly off-center.
- Blocking outlets: pushing solid-back tables over plugs kills lamp and charger access.
- Floating too far out: 3-4 inches off wall wastes clearance and looks unfinished.
- Hanging art too high: 14-inch gap disconnects art; keep 6-8 inches.
- Skipping anchoring: narrow tables tip when kids pull drawers or climb shelves.
Conclusion
Center to usable wall, go nearly flush, align art 6-8 inches above, solve outlets with offset or open backs, and anchor to studs. Those five moves turn any wall into a polished drop zone. Next, dial in depth and explore small-space layouts.
🔥 Today's Best Console Table Deals
Hand-picked discounted picks from AliExpress — prices change often, check the live price.
 -47%
-47% -46%
-46% -37%
-37%